AI Productivity Tools (MCP setup)
🚀 Getting Started
Before configuring MCP integrations, you need the IDE installed and authenticated with your GM account. Use the GM-approved paths below.
🟦 Install VS Code
VS Code is available directly through the GM ServiceNow Software Catalog — no manual download needed.
- Go to the VS Code Software Catalog item in ServiceNow.
- Request the installation — it will be pushed to your GM laptop.
- For detailed steps, see: Installing VS Code on Your GM Laptop via ServiceNow
⬛ Install Cursor
GM has 2,500 Cursor licenses available. Access is granted through your Microsoft group membership.
If you are in the AV Org:
- Access is automatically granted to all AV org members.
- Confirm your membership by searching for group
gpd_1002972_all_gmat myaccount.microsoft.com. - Full onboarding guide: Cursor Onboarding (AV Org)
If you are a general GM employee (non-AV Org):
- Full onboarding guide: Cursor Onboarding (Non AV Org)
Install steps (both orgs):
- Download Cursor from cursor.com/downloads.
- Launch Cursor and select Log In during setup.
- Enter your GM email address — Cursor will redirect you to Microsoft SSO / MFA.
- Complete setup prompts (optional: import VS Code settings, choose theme and keybindings).
- Enable "Open From Terminal" on the final setup screen.
Need help? Reach out in #help-cursor on Slack.
⚙️ The mcp.json Configuration File
mcp.json is the file your IDE reads to know which MCP servers to connect to and how to reach them. Each entry represents one integration — either a remote HTTP endpoint or a locally-launched process. The latest GM MCP list is in the GM AI MCP Registry.
⬛ Cursor
Config file location:
~/.cursor/mcp.json
Open it: Cmd+Shift+P → "Open MCP Config", or go to Cursor Settings → MCP for a visual view of all servers and their connection status.
Project-scoped config: Place an mcp.json inside a .cursor/ folder at the root of any repo — it takes precedence over the global config for that workspace.
Top-level key: "mcpServers"
What a complete Cursor setup looks like:
Once you have all GM-approved integrations configured, your ~/.cursor/mcp.json should look something like this:
{
  "mcpServers": {
    "sourcegraph-gm": {
      "url": "https://gm.sourcegraph.com/.api/mcp",
      "transport": "streamableHttp"
    },
    "Lucid Software": {
      "url": "https://mcp.lucid.app/mcp"
    },
    "Atlassian": {
      "url": "https://mcp.atlassian.com/v1/mcp"
    },
    "slack-all-company": {
      "url": "https://mcp.slack.com/mcp",
      "auth": {
        "CLIENT_ID": "3660753192626.8903469228982"
      }
    },
    "glean_default": {
      "type": "http",
      "url": "https://general-motors-be.glean.com/mcp/default",
      "headers": {}
    },
    "Atlan": {
      "url": "https://gm.atlan.com/mcp"
    },
    "anomalo": {
      "command": "uvx",
      "args": ["anomalo-mcp"],
      "env": {
        "ANOMALO_INSTANCE_HOST": "gm.anomalo.com",
        "ANOMALO_API_SECRET_TOKEN": "<API TOKEN / ENV VAR>"
      }
    },
    "databricks": {
      "command": "/<USER HOME>/.ai-dev-kit/.venv/bin/python",
      "args": ["/<USER HOME>/.ai-dev-kit/repo/databricks-mcp-server/run_server.py"],
      "env": {
        "DATABRICKS_CONFIG_PROFILE": "<YOUR DATABRICKS CLI PROFILE>"
      }
    }
  }
}
After editing, restart or reload MCP connections in Cursor for changes to take effect.
🟦 VS Code
MCP support in VS Code is powered by the GitHub Copilot extension. The config structure is slightly different from Cursor — the key differences are called out below.
Top-level key: "servers" (not "mcpServers")
Config file locations:
| Scope | Location | When to use |
|---|---|---|
| User-level | User profile mcp.json | Applies across all projects |
| Workspace-level | .vscode/mcp.json in repo root | Applies to one project only |
Open it: Ctrl/Cmd+Shift+P, then use one of:
- "MCP: Open User Configuration" — global config
- "MCP: Open Workspace Folder MCP Configuration" — project-scoped config
Other useful commands (Ctrl/Cmd+Shift+P):
| Command | What it does |
|---|---|
MCP: Add Server | Add a new MCP server interactively |
MCP: List Servers | View all servers, start/stop/restart, or see output |
MCP: Browse MCP Servers | Open the MCP server gallery |
MCP: Reset Cached Tools | Refresh tools after a server config change |
Handling secrets: VS Code supports "inputs" variables — instead of hardcoding API keys or tokens directly, VS Code prompts you on first use and stores the value securely.
Full reference: VS Code MCP Configuration Docs
GM-specific guide: Configuring Sourcegraph MCP for GitHub Copilot in VS Code and Cursor
🛠️ GM Databricks Skills Library
GM-InnerSource/gmdm_1000781_databricks-skills is a set of GM-prefixed agent skills that mirror and extend the Databricks AI Dev Kit skill set. They augment — not replace — the stock databricks-* skills by layering in GM-specific naming conventions and governance standards from GMDM 1000781.
What it does
- GM governance layer — each
gm-databricks-<area>skill points to a sharedgmdm-1000781-standards.mdreference file that enforces GM-approved naming and configuration standards on top of the upstream Databricks skill behavior - Mirrors the AI Dev Kit — one
gm-*skill folder per upstream Databricks skill, so your agent always has both the product behavior and GM guardrails available simultaneously - Works across all three IDEs — installs into Cursor, GitHub Copilot (VS Code), or Databricks Genie Code via simple shell or PowerShell scripts; no build tooling required
- Invoke explicitly or automatically — use
@gm-databricks-<area>to invoke a skill directly, or let Agent mode pick the right one automatically based on context
Installing
Prerequisites: A working PowerShell or bash shell. Nothing else required.
Clone the repo and run the installer for your IDE:
# Cursor
bash ./install_gm_skills_cursor.sh

# GitHub Copilot in VS Code
bash ./install_gm_skills_copilot.sh
# Cursor (Windows / PowerShell)
.\install_gm_skills_cursor.ps1

# GitHub Copilot in VS Code
.\install_gm_skills_copilot.ps1
After install, restart or reload your AI assistant. Skills are picked up automatically in Agent mode.
| Assistant | Skills installed to |
|---|---|
| Cursor | ~/.cursor/skills/ |
| GitHub Copilot | ~/.agents/skills/ |
Tip: If you have the Sourcegraph MCP configured in your agent, you can skip cloning entirely. Just ask:
"Install this utility from GitHub: GM-InnerSource/gmdm_1000781_databricks-skills"
The agent will locate the repo, read the install instructions, and run the setup for you.
📦 Additional Setup for Local MCPs
Most integrations in the config above connect to a remote URL and require no local dependencies. However, Anomalo and Databricks run as local processes and need additional libraries installed on your machine before they'll work. Both depend on uv to create a virtual environment for package installation.
On macOS:
brew install uv
On Windows:
powershell -ExecutionPolicy ByPass -c "irm https://astral.sh/uv/install.ps1 | iex"
Anomalo MCP
The Anomalo MCP is a Python package that runs locally and communicates with gm.anomalo.com using your API token.
High-level steps:
- Ensure Python 3.9+ is installed.
- Generate an API token from your Anomalo profile settings and add it to the config under
ANOMALO_API_SECRET_TOKEN.
Full install instructions: anomalo-mcp on PyPI
Databricks MCP
The Databricks MCP is part of the AI Dev Kit — a local toolkit that includes the MCP server, a Python virtual environment, and the Databricks CLI.
High-level steps:
-
Clone the AI Dev Kit repo and run the quick-start setup script (creates a
.venvand installs all dependencies). Install the entire AI Dev Kit — do not select the "MCP Tools Only" option.On macOS:
bash <(curl -sL https://raw.githubusercontent.com/databricks-solutions/ai-dev-kit/main/install.sh)On Windows:
irm https://raw.githubusercontent.com/databricks-solutions/ai-dev-kit/main/install.ps1 | iex -
Configure a Databricks CLI profile (
~/.databrickscfg) with your workspace credentials.On macOS:
brew tap databricks/tapbrew install databricksOn Windows:
winget search databrickswinget install Databricks.DatabricksCLIThen configure the default profile:
databricks auth login --host <workspace-url> -
Update
mcp.jsonwith your home directory path and the CLI profile name you configured.
Full install instructions: AI Dev Kit Quick Start on GitHub
🔐 Authenticating MCP Servers
Once your mcp.json is saved and your local dependencies are installed, the next step is authenticating each server. The authentication method depends on the type of integration.
| Integration | Auth method |
|---|---|
| Atlassian, Atlan, Slack, Glean, Lucid Software, Sourcegraph | OAuth via browser (sign in with your GM account) |
| Anomalo | API token set in mcp.json env vars |
| Databricks | Databricks CLI profile set in mcp.json env vars |
⬛ Cursor
- Open Cursor Settings → MCP (or
Cmd+Shift+P→ "Open MCP Config" then navigate to settings). - Each OAuth-based server will display a "Login" link next to its name on first load — click it to complete authentication in your browser using your GM account.
- Local process servers (Anomalo, Databricks) authenticate automatically via the credentials in your
mcp.jsonenv vars — no browser login needed.
When everything is configured and authenticated, each server shows a green dot and reports its available tools. A fully connected setup looks like this:
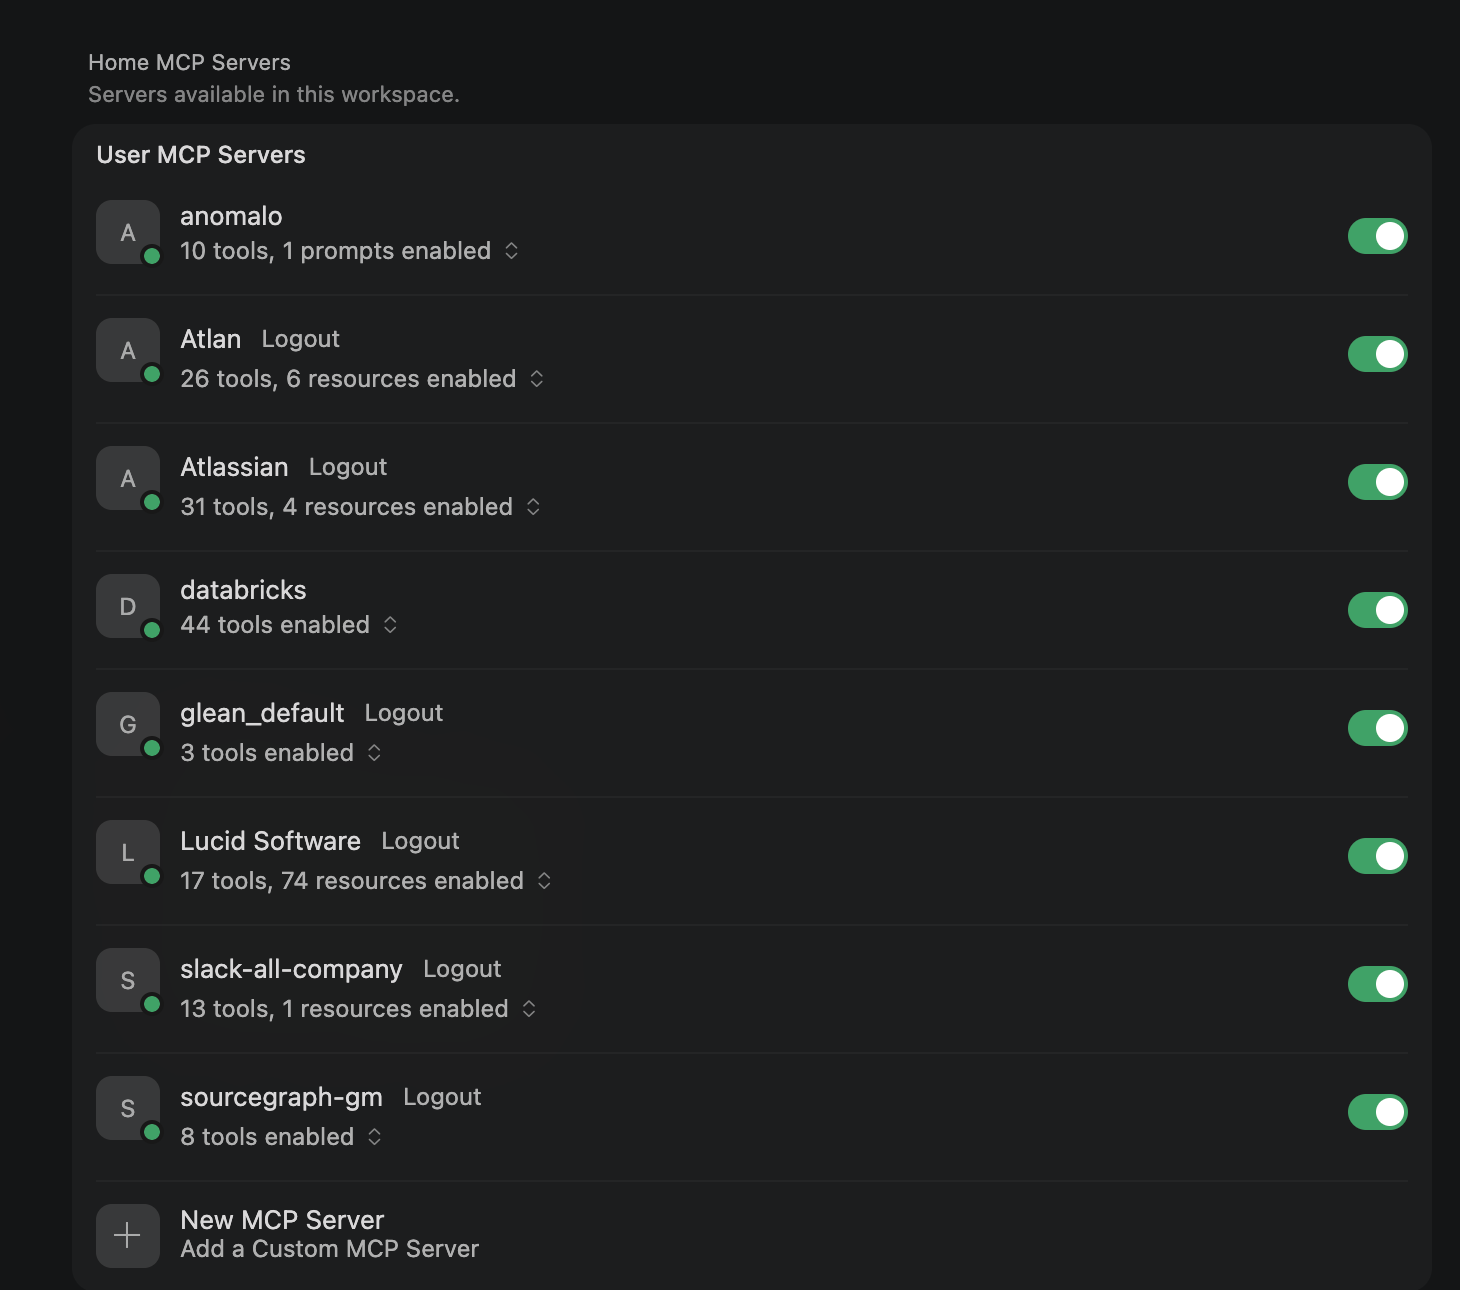
If a server shows a red dot or no tools, check that the entry in mcp.json is correct, the server is reachable, and (for OAuth servers) you've completed the login flow.
🟦 VS Code
- Open the GitHub Copilot chat panel (
Cmd+Shift+P→ "GitHub Copilot: Open Chat"). - When you first use a tool from an OAuth-based MCP server, Copilot will prompt you to sign in — follow the browser redirect and authenticate with your GM account.
- To manage server status at any time, use
Cmd+Shift+P→ "MCP: List Servers" — from there you can start, stop, restart, or view output logs for any server. - Local process servers (Anomalo, Databricks) use the credentials defined in your
mcp.jsonand do not require a browser login.
💬 Join the Community
Have a question, hit a setup snag, or discovered a new way to use AI tools to get more done? Come join the conversation.
#ai-data-engineering is the go-to Slack channel for anyone at GM exploring AI productivity tools. Whether you're troubleshooting an MCP integration or sharing a breakthrough workflow, this is the place.
- Ask for help getting set up
- Share new MCP integrations or prompts that have made a difference
- Stay current on what tools and patterns the team is adopting
- Connect with others building AI-assisted workflows on GM's data platform
🤝 Contributing to this page
This page is maintained by the GM Data Engineering community — anyone can contribute!
As new MCP integrations are added, configs change, or better setup patterns are discovered, this doc should stay current. If you've set up a new MCP server, found a better way to configure one, or spotted something outdated, please update it.
How to contribute
- Open the repo: DATA_1266565_data-gm-com-docusaurus
- Create a new branch off
main:git checkout -b docs/update-ai-mcp-tools - Edit this file at:
src/pages/ai-mcp-tools-setup.mdx
- Open a pull request — check the
docsbox in the PR template under Type of Change. - Once merged, changes go live on data.gm.com automatically.
What's worth contributing
- New MCP server entries (sanitized — no real tokens or personal paths)
- Updated URLs or config keys as tools evolve
- Troubleshooting tips or common setup gotchas
- Links to related internal docs, Confluence pages, or Slack channels
Questions or feedback?
Drop a message in #feedback-data-gm-com on Slack.